Monday, November 20, 2006

Potato curry and methi theplas


I love to try out new cuisine, just about anything at least once. But today was one of those days where I just wanted something homecooked, Indian, and super spicy. Considering we are leaving for the holidays in a couple of days, I had to make do with whatever was lying around. So, I decided to use methi to make a Gujarati flatbread and traditional Telugu potato curry. Simple but oh so, delicious, in fact the methi even adds a nutritious element to the meal.


Methi Theplas

2 cups of whole wheat flour
1/2 cup of finely chopped fresh methi leaves
2 green chillies chopped
1 tsp red chilli powder
1/2 tsp cumin powder
1/2 tsp corriander powder
1 tsp vegetable oil
1 tbsp ginger-garlic paste
2 tbsp roasted sesame seeds
1/2 tsp turmeric
salt to taste

Mix all dry ingredients together. Then add ginger-garlic paste and oil and form a pliable dough with water. If the dough gets sticky just add more flour. Let dough set for 15 minutes. Make walnut size balls out of the dough and roll out into flat discs. Place discs on a hot griddle and fry till both sides of disc are golden brown. Dot with butter and serve hot.

Telugu Potato curry

4 medium size potatoes chopped
2 medium sized onions chopped
2 medium tomatoes chopped
1 tsp mustard seeds
2 tsp chilli powder
1 tbsp ginger-garlic paste
Cilantro and curry leaves for garnish
Salt to taste

Heat oil in a saucepan. Add mustard seeds and wait till they finish popping. Add onions and tomatoes. Add chilli powder and ginger-garlic paste and cook till tomatoes seperate from their skins. Add potatoes and add enough water to just submerge the potatoes (~2 cups). Cook covered till gravy is thickened and potatoes are cooked completely (test by taking a potato piece and squishing with the back of a spoon, potato is cooked if completely mashed under pressure). Serve garnished with curry leaves and cilantro.
Sunday, November 19, 2006

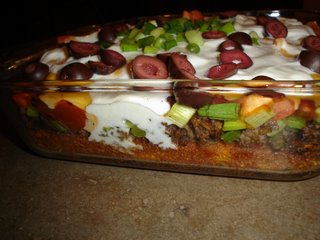
Cornbread mexicana


Mexican food, as is sushi, is slowly creeping up on my list of favorites. I'm not confident enough yet to serve raw fish but mexican cuisine doesnt intimidate me too much. I got the inspiration for this dish from Food network's Rachel Ray. I love her simple dishes, with flexible measurements AND ingredients. I couldn't watch the entire episode but got enough of an idea to try this. Such a variety of textures and flavors that can all be mooshed up into a single bite... definitely one of our current favorites. It's also great to get rid of lots of singlet vegetables in the fridge.

Cornbread mexicana

For Corn bread
1 package jiffy cornbread mix
1 egg
1/3 cup milk
4 tbsp frozen corn kernels

Pretty much follow package instructions, mixing in egg, milk and cornbread mix. Add corn kernels and follow package baking instructions.

For Toppings

Meat
1/2 lb ground beef/turkey ( more if you like it extra meaty)
1 tsp cumin seeds
1 tsp chopped garlic
2 tbsp taco seasoning
salt to taste
1 tbsp vegetable oil

Heat oil in a pan and add cumin seeds and garlic and fry till garlic turns golden brown. Add meat, salt and taco seasoning. Cook till meat browns, adjust spices according to taste.

Beans
1 cup canned kidney beans
1 small onion chopped
salt to taste
1tbsp vegetable oil

Drain and wash kidney beans. Fry onions till soft. Add kidney beans and salt and cook for a few minutes.

Vegetable toppings
3 chopped spring onions
1 small tomato chopped
1 green pepper chopped
1/4 cup chopped olives
1/2 cup shredded cheddar/american cheese
1/2 cup salsa
1/2 cup light sour cream


For Cornbread mexicana

Remove the cooked cornbread from the oven. Layer the prepared meat, beans, spring onions, tomato, green pepper, salsa, olives and cheese on the cornbread. Reserve some spring onions and olives for garnish. Put the cornbread back in the oven for a few minutes till the cheese melts. Remove from oven and let stand for 10 minutes. Spread a layer of sour cream and garnish with chopped spring onions and olives.

Saturday, November 18, 2006

Semiya Payasam/ Vermicelli pudding

There are many things from my undergrad days that are best buried, but there are some memories I will always cherish. Among the memorable, are the adventures in our girls-only hostel. Sneaking naps during study hours, stealing food from the dining room, dancing in the monsoons, midnight birthday parties, rooftop shooting star rendezvous, gigantic lizards fighting in the computer room...that last one maybe good to forget!! More often than not, when people talk of hostel life the first thing you'll hear is the nasty food but strangely enough our food was actually pretty good, we always had dessert as part of lunch-- always an indication of a good meal if you ask me. We would have fresh home made indian sweets (ladoo, gulab jamun, rasgulla), or a variety of cakes and ice cream. My favorite there had to be Paruppu payasam (milk pudding made with lentils) and most hated-- Semiya payasam. Lucky for me my roommate loved semiya... so our agreement was I would give her my share of semiya payasam if she gave me her paruppu payasam. I'd like to think my recipe (inherited from my mom) is a tad bit better than the starchy milky glue we got at the hostel.


Semiya Payasam

1/2 cup packed very fine vermicelli (wheat noodles)

4 tbsps sugar

3 cups whole milk

2 tbsp unsweetened grated coconut

3 pods of cardamom (slightly opened) or generous pinch powdered cardamom

1 generous tbsp of ghee (clarified butter) or butter

In a pan saute cashewnuts and raisins in ghee till cashews are golden brown. Remove the raisins and nuts and in the same pan add the vermicelli and roast for 10 mins on medium heat or till the noodles turn a golden brown. Meanwhile in another saucepan boil milk with sugar, coconut and cardamom. Once the milk is boiled, add the vermicelli and cook for 15 mins on medium heat. I like my semiya a bit thick, so I boil it for 15 mins but if you prefer it more watery then stop cooking immediately after you notice the noodles soften. Serve garnished with cashewnuts and raisins.

Variation: You can use rice instead of the vermicelli, just skip the initial roasting step. You may also have to boil the rice in milk for longer (~20 mins) -- one way to test is to take a grain of rice and squish it between your fingers, if cooked completely you should not feel anything crumble, just a smooth smoosh.

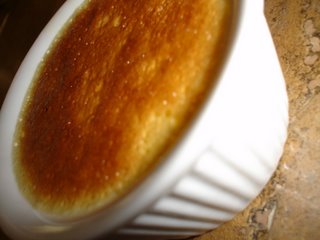
Creme sans Brulee

I was trying to prepare my first meal for my parents as a married woman. Goodness knows the number of calamities they've witnessed during many of my culinary experiments growing up. But now that I'm married, I wanted to make them a meal that was just perfect. My mom loves dessert, especially anything custardy. Having found an entire creme brulee kit hidden in the deepest bowels of my husband's bachelor-day-kitchen-gadgets cupboard, it was but the natural choice for that particular evening. The original recipe said to torch sugar for the brulee an hour before actual serving, so as is habit, I saved that worry for when it was time. So I went about dilligently preparing the custard and so on, and when it was time to get ready for dessert, I thought I should first test the torch and for some reason it just wouldnt work, we tried lots of different things but just couldnt get the wretched thing to work-- so after struggling for about 15 mins, we accepted defeat and decided to read the manual (of course the last resort) and found that we actually needed fuel for the torch to light up-- Go figure :) ! So much for an all-inclusive creme brulee kit. We ended up having the custard without the crusty burnt sugar which turned out to be pretty delicious all the same.


Creme sans Brulee

2 cups heavy cream

1/2 cup sugar

1/2 tsp vanilla extract

8 large egg yolks

Method

Beat egg yolks and sugar until sugar is completely dissolved and egg yolks turn a paler yellow. Heat cream in a sauce pan for 5 minutes or until tiny bubbles form all around, avoid boiling, if you think you have boiled it let stand for a couple of minutes before proceeding. Add one tablespoon of the warm cream to the egg yolk mixture and mix until fully incorporated. Repeat process one tablespoon of cream at a time till all of the cream is used up. Add vanilla extract to this mixture (custard). Spoon this custard into oven proof ramekins. Place all ramekins in an oven proof pan (maybe even a cake pan would work). Pour boiling water into the oven proof pan till water reaches half the level of the ramekins, take care not to spill water into ramekins. Place the oven proof pan with ramekins into a 250 F preheated oven for about an hour. The custard is done if it is set around the edges and only a small portion in the middle jiggles. For darker top layer place the ovenproof pan closer to the top of the oven for maybe 3 minutes (watch carefully to prevent burning). Remove the pan from the oven, remove the ramekins and let sit at room temperature till cool. Wrap with foil or plastic wrap and refrigerate till time to serve.

Globalization via Tomato Rice!

Saturday noon, my parents flight lands in 4 hours. I'm trying to squeeze in grocery shopping, prepping dessert for dinner, as well as dinner itself, house cleaning touchup, a pedicure AND lunch. So, I scan the fridge for what I can put to together with as little time and effort as possible. My gaze falls dead on white rice leftover from dinner the night before, another quick 360 degree scan captures a quarter jar of habanero salsa that we found at a farmers market on our last trip to Sedona. So thats it, a traditional south indian rice dish with habanero salsa stuffed in green peppers for a seamless mesh of mexican and indian cuisine! A friend of mine actually replaced the salsa with pasta sauce and said it was just as delicious, I haven't tried it myself but dont see how you can go wrong.


Habanero Salsa Tomato rice

3 cups cooked rice
1 medium onion (sliced)
1 small tomato chopped
1 cup habanero salsa
1 tbsp ginger-garlic paste
2 tbsp vegetable oil
1 tsp ghee (clarified butter)- optional
1/2 tsp cumin seeds (jeera)
1/2 tsp mustard seeds
1/2 tsp chana dal (split dried chick peas)- optional
1 tsp chilli powder (or to taste)
4-cloves, 1/2 inch piece cinnamon stick, 4- cardamom pods: powdered together or use 1 tsp garam masala
1 tsp garam masala for garnish
8-10 curry leaves (Helichrysum italicum), available in all Indian stores-- just ask
2-3 green chillies
2 large green peppers
1 tsp lemon juice
salt to taste

Method:

Tomato rice:
Heat oil in saucepan. Add chana dal, cumin and mustard seeds and heat till the mustard seeds are done popping. Immediately add onion and tomato, ginger-garlic paste, salt, green chillies and chilli powder. Fry till tomatoes seperate from their skins (sounds sick i know but you get my point). Now add the habanero salsa and cinnamon-clove-cardamom (or garam masala) spice powder fry for a few more minutes. Add the curry leaves and stir a few times. Add the cooked rice to the sauce, tomato rice is now ready.

Peppers:

Dunk whole green peppers in hot water and let soak for 5 minutes. Remove peppers from water and cut off the stems carefully and deseed. Stuff the peppers with the tomato rice. Place stuffed peppers in oven proof dish, spray with pam or dot with butter. Sprinkle garam masala and lemon juice over the peppers and bake in preheated oven at 350 F for 15 mins or till the peppers get wrinkly.


Possible variation: 1. layer seasoned and cooked ground meat and cheese along with rice when stuffing peppers.
2. Omit the peppers altogether and just serve tomato rice with mint chutney.

Thursday, November 09, 2006

In-law and Chinese Eggplant


After a rare late day at work, I found myself stuck in sickeningly slow traffic that lengthened my commute three fold. Ever since the move to Phoenix, I have only explored surface streets and the remarks that follow are based on close observation of the same and are not affected by any predisposed misconception of desert folk (well, at least not too much).
See, I would be a little more understanding if I was stuck in back to back traffic that I've learnt to accept in Boston and Maryland, but no, there are miles and miles of practically empty sand banked road but grandpa (not literally, but he might as well be) in front of me moves at 20 mph in a 45 mph zone (this is probably East Indian conversion but to me, 45 equates to 65--very least). Now I don't know if its just me, but when I leave home for work, every microsecond counts-- the sooner I get from A to B the better. But here in Phoenix, it seems like people actually freaking ENJOY their commute!! I mean seriously, I will forgive the occasional goody-two-shoe driver but EVERYDAY I encounter at least 20 puritans. The worst is if you have 2 of them side by side-- grandpa Vs. grandpa. So thats what happened today, with the added complexity of the roads actually being crowded (in surface street standards that means you see 5 cars within a radius of 200 feet), with these commute-happy drivers cruising below speed limit for no apparent reason.
Finally get home and just begin to unwind when mother-in-law calls enquiring about my nagging toothache. Of course she has to ask what I'd made for dinner and lucky for me today I had a valid excuse, told her we were going to the gym and would probably grab something after. She seemed satisfied with that. All would have been fine if Selvin didnt tell me, after I hung up of course, that he' d told his mother about the delicious dinner he'd prepared when I was down after a root canal, just 2 days ago. Now of course, I felt like a slacker wife. To make things worse, after our work out my man wants to pull into a Wendy's drive thru because he said we didnt have any groceries at home, yeah he was right but given the events prior there was no way we would eat anything except something, anything I made. So we got home and I finalized on the only veggie that still looked semi edible. Chinese Eggplant-- the elongated, narrow kind. And this is what I did for a 15 minute stir fry with House of Tsang's Saigon stir fry sauce. Warm white rice was a great side.


Chinese Eggplant stir fry

3 medium Chinese eggplants
4 cloves of garlic
1/2 cup sliced onions
1/2 cup chopped tomatoes
2 tbsp sesame seed oil
3 tbsp (or more to taste) House of Tsang's Saigon stir fry sauce **
Cilantro for garnish

Method

Slice the eggplants into halves *lengthwise* and then into 1 inch long pieces.
Pour sesame seed oil into a nonstick saucepan. Add chopped garlic and fry for a few seconds to impart flavor. Add eggplants and fry on medium-high heat till soft but not mushy (around 3 mins), you may have to cook covered for 2 mins. Add onions and tomatoes and stir a few times being careful not to mash eggplant. Now add the sauce, toss around for a minute or so. Serve garnished with cilantro.

**Just looking at the ingredients on the label I think this can easily substituted with a little sugar mixed with dark soy sauce, garlic powder, chopped cilantro, crushed red peppers, dried anchovies crushed to a powder.

Wednesday, November 08, 2006

Caramelized Onion and Cherry Tomato Tart, Autumn pear salad

Searching for a Gujarati recipe that my ex-roomie once made for me, I came across one beautiful cookery blog, Saffron Hut that led me to yet another gourmand, Beyond Salmon. Simply gorgeous food presentation and interesting write-ups. I was just captivated by the simplicity of the Tomato Onion tart, so much so, that I had to try it and guess what? Served alongside a pear-pecan salad, it was a big hit! Of course I made slight alterations, but if you like, here's the original recipe. We loved gruyere cheese I'm sure it'll sneak its way into another recipe sometime!


Caramelized onion and cherry tomato tart

1 frozen pie crust (I used Marie Callander's 9 inch)
1.5 lbs yellow onions
1.5 cups of grated gruyere cheese
2 cups cherry tomatoes chopped into halves
1tbsp butter
1tbsp vegetable oil
1 tbsp balsamic vinegar (optional)

Method:

Heat butter and oil in saucepan and add sliced onions. Cook on low-medium heat stirring occasionally till the onions seem light golden brown (~ 45 mins). At this point, preheat oven to 475 F. To the saucepan with onions, add balsamic vinegar, continue cooking till onions turn nutty brown (~10 minutes) and then keep aside.
Poke holes into the pie crust with a fork -- curb that aggression and keep it sporadic. This step is important otherwise the crust will puff up in the middle and wont contain its shape. Place the pie crust in the oven for 10 minutes or till light brown. Then remove from the oven and add the caramelized onions, grated cheese and arrange halved tomatoes in concentric circles around the tart. Reduce the temperature of the oven to 325 F and place again in the oven for 10 minutes. Now move the tart to the highest rack in the oven and bake till the tomatoes get more or less evenly wrinkly. Let cool for 15 minutes before serving.


Autumn Pear Candied Pecan Salad (Not shown in picture)

1 bag Mixed greens
1 Pear (sliced thin lengthwise)
1/2 cup candied pecans (readily available in stores)
1/2 small yellow onion (chopped fine)
2 handfuls feta cheese (crumbled)
1/4 cup dried cranberries
5-6 cherry tomatoes
2 tbsp Italian dressing

Method: Combine all ingredients except dressing. Pour on dressing a couple of minutes before serving.

Beginning

I've always felt blogs were for the dilligent cataloguer, you know the kind if in a lab have 20 full logbooks for a week's work. Or they were meant as a ubiquitous vent for people like my sister who at any given second have a million things to say. But some mindless blog browsing did boost my confidence...material not essential, eloquence not crucial, intelligence-- dispensable. Sometimes its nice just to share what you know, maybe even therapeutic.